- Continue Shopping
- Your Cart is Empty
Halloween Hoodies
Nanik and Hari's latest video is a DIY Tutorial on making your own Halloween costume out of a hoodie. I love making Halloween costumes!
View full article →
Summer Camp: Cardboard Arcade Challenge
One of the things we did at camp this summer was a cardboard arcade challenge.
Early in the week, the 9-12 yr olds watched the Caine's Arcade video. This is a great video. Out of 4 camps worth of kids, only one of them had seen it before!
We spent the next couple of days working on various projects with motors and LEDs. I encouraged the kids to work on their plans for the games. Our camp was two 1/2 day sessions. One group was 9-12 years old, the other 6-8 years old. While I spent a 1/2 day making with one group, the others were out doing recreation activities with two awesome GNAG counselors. For the cardboard arcade challenge, the idea was for the older kids, the 9-12 year olds, to make the arcade games and host an arcade for the younger kids.
I was totally and completely blown away by the complexity of the games and how much care they took setting everything up.
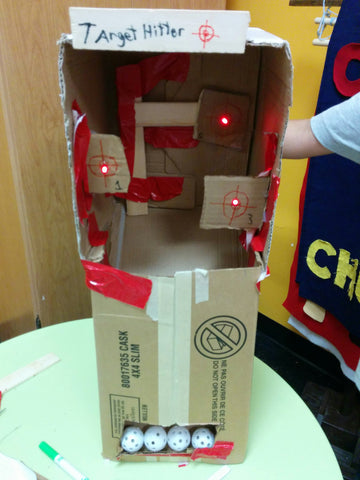
I was primarily focused on making the games. And the games were impressive. We had water games, pinball games, ball throws, basketball games. Even spinning games of chance! The kids worked with rubber bands and angles and levers to get the movement they wanted. Some of them started introducing the tech we were working with earlier in the week.
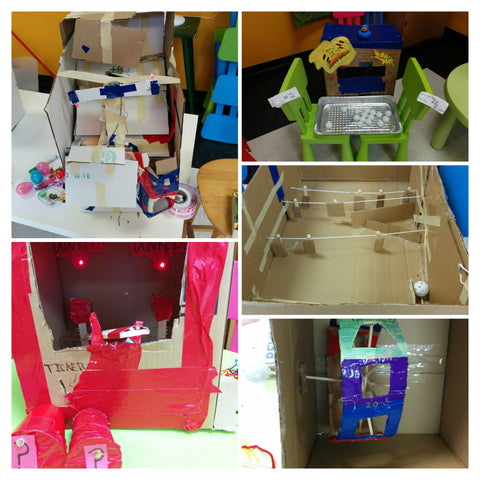
The games were awesome. But so was the prize table! The kids who were done their games first made prizes to give away to the little kids. They set up a structure and some rules about prizes, and even made tickets. (The second week I brought tickets in - mistake! It's more fun to make your tickets.)

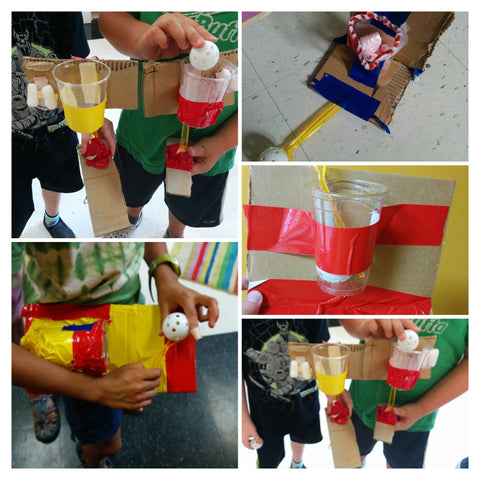
The younger kids made games too. We watched Caine's Arcade and they spent a shorter amount of time working on their games. Some games were simple - a cup, a spoon, and a ball. Some games got really complex. Motors were very popular!
What I didn't expect was how long after camp the activity would stick with them. My first hint was this tweet:
Today's viewing of @CainesArcade at @GNAG_Ottawa's @maker_junior camp inspired boys to make our dog a new doghouse! Stay tuned.. #makered
— Allison Burnett (@OrgChaos_allibu) August 21, 2015
Which was followed by:
@maker_junior @CainesArcade @GNAG_Ottawa Our dog quite likes his new digs! #maker pic.twitter.com/Ed0pACbS3u

— Allison Burnett (@OrgChaos_allibu) August 22, 2015
And then I started hearing about Will's Arcade. Will was one of the older kids in the 6-8 year old camp. He's attended a few workshops with me before and exhibited his work at the GYA Science Hack we took part in. When Will's mom started emailing me a couple of weeks ago with pictures of Will's Arcade, I wasn't that surprised.
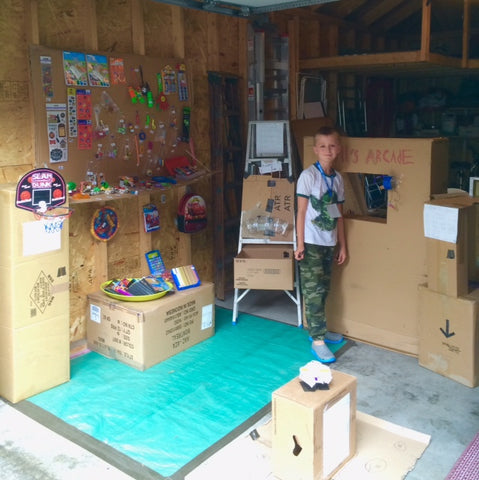
But the cool thing was, he kept going! Will's has now been working on his arcade since camp, six weeks. He has it open on the weekend for customers. And he's made enough money to refill his prize wall - twice!
The only problem is - it's getting colder. And soon Will's Mom and Dad are going to need to use their garage for their car.
Awesome job, Will!

The 2015 Global Cardboard Challenge is October 10. You can find out more about the challenge, the Imagination Foundation, and what's going on in Ottawa that day at their website.
A Summer Project: Starting a YouTube Channel
The boys have been talking about starting a YouTube channel for ages. Both of them choose to spend most of their screen time on YouTube. They are usually doing research. Nanik likes fish videos (he loves The King of DIY, full of aquarium projects) and Hari splits his time between BookTubers, GMM and Cole and Marmalade. It's funny, this generation is growing up on video. I've always been better with words and reading. But both boys start their research on YouTube.
When school ends they always choose a couple of projects to work on during the summer. This summer one of the projects they chose was to work together on starting a YouTube channel for Maker Junior. I was more than happy to have them take this on. They obviously know more about this medium than I do.
Through their involvement with Youth Ottawa, they discovered Youth Active Media. YAM runs multi-week programs during the school year. This summer they started one-week programs at various libraries and community centres around the city. Nanik took the program early in the summer. (You can see his video The Book Quest on YouTube.) Hari's just finished his week. (Hari's video is Searching for Sasquatch.) They spent several weeks researching camera equipment. Maker Junior provided the budget.
[Note on summer projects: I discovered, this summer, that if you ask your kids to do something, and you agree with what they're doing, you gotta provide a budget to go with it. ]
They worked hard to get the equipment ready for Maker Festival in Toronto. They wanted to interview people and ask them some questions they've been thinking about: "What is a maker?" and "Do makers have to use tech?" I am thrilled with the end result.
Working on the video at the Maker Festival helped them meet new people and explore more of the event. Asking the questions started some great conversations! From my perspective, Mom's perspective, I thought this project helped them:
- discover their strengths (So, um, Hari is a natural in front of the camera. Nanik loves research and equipment. Video editing software has been a challenge for both of them but Nanik is doing a great job of it so far!)
- continue to build their research skills, with real world results
- gain confidence in their abilities to learn something new and apply it
- reach out and meet a community of people
And they've only just begun! It's been a pretty fantastic beginning though. On their first day of filming, ever, they managed to get an interview with John Tory, Mayor of Toronto. What a scoop! And John Tory has my gratitude for gracefully sharing his tips for conducting a professional interview and providing thoughtful answers to their questions. And for signing their release form agreeing to appear in the video.
Back to School Sweepstakes!
Happy Back to School! It's a new school year and to celebrate getting back into the classroom and back into routine we are giving away an Educators Pack of our BlinkyBot kits.


Our Educators Packs come with enough material for 10 BlinkyBots, including felt, googly eyes, batteries, conductive thread and LEDs. Also included are our easy to follow instructions (in English and in French) and our Workshop Tips. Our Workshop Tips have been developed after hours of hands-on testing with multiple age groups. They include practical logistics and great workarounds for younger students. We want everyone to be successful with their first projects!
Our contest is open to all residents of Canada (except Quebec) and the US over the age of 18.
To enter, leave a comment on our blog telling us how you will use the Educators Pack. The winner will be chosen at random and must be able to correctly answer the following skill-testing question:
What does the L in LED stand for?
Contest closes September 30th, 2015 at midnight.
For more chances to win, share this post on social media and email me the link!
Adding chocolate and marshmallows to your projects
Yay! It's summer! During the last week of school at the JH Putman maker club, Mrs. Lee had the wonderful idea to build solar ovens.
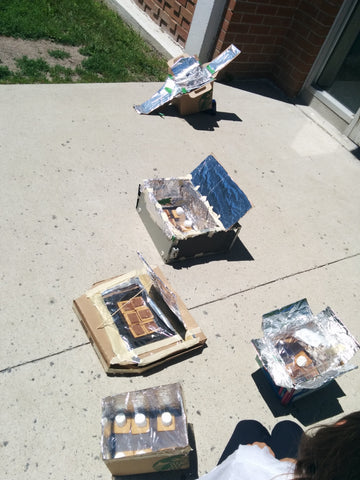
We weren't starting completely from scratch, the Grade 7 Science classes were also building solar ovens. Most of the kids appreciated the extra time to work on their science projects.
We used all recycled materials. One of the groups even used the empty case from a desktop computer we took apart. See if you can see it in the picture up above.
From my brief introduction to solar ovens, it looks like you need to you:
- reflect light (foil!)
- absorb light (black paper)
- keep the heat in (I found some foam that worked well)
Testing, as always, was my favourite. The chocolate melted quickly. After 20 minutes the marshmallows were definitely soft, but not runny. Need to keep working on my design... yum!

Why is making with kids so important?
I know intuitively just how important it is. I've seen my own sons learn and grow with the projects they've been working on. Agency by Design is a multi-year research project that is specifically looking at maker-centered learning practices. They released a whitepaper of their initial findings in January 2015. View full article →Focus and Dedication: A Multi-week Inventive Effort

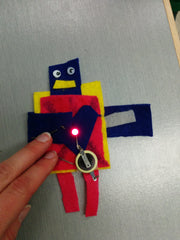
This is one cool invention. The inventor has taken the GNAG Inventors Workshop for several sessions. This session, instead of following along with the usual projects, this young inventor took the materials from each project and added on to this creation. Here's a breakdown of the features and what projects they come from:
- Storage compartment access flap (around the back) has a circuit "puzzle" on the back that both lights and buzzes when successfully completed. This is from two projects, Quiz Cards and Design Your Own Game.
- Voice recorder that captures and records instructions is hidden under the nose. This is from the Talking Stuffie project. As is the design and decoration of the head!
- Jointed elbows and shoulders come from the Articulated Hand project (and yes, one hand is fully articulated).
- Treads. That was the tough part. We tried several different ideas using wheels and bicycle inner tubes during the weeks we use for Inventions. During the last week we came up with using pool noodles and dowels. The inventor was very satisfied with this solution!
Myself, I'm thrilled with this invention! I completely respect the amount of focus and dedication required to put this together. Not to mention the attention to detail!
Inventor Workshop Creations, 6-8 yr olds
We're wrapping up our latest session of the GNAG Inventors Workshop and we've started working on our inventions.
This year we started an afterschool class for the 6-8 year olds. It has been very popular! It is a very different class from the 9-12 year olds. More spontaneous. Some of the kids are really interested in the inventors notebook we keep and fill it up with ideas. I explain that we're creating prototypes. I bring in the tech we've worked with (motors/LEDs/etc), materials I've found, and pieces we've discovered during a Make and Break.
One of my youngest inventors wanted to make a tablet computer and kept their focus on that all year. This is the result (it's currently running a Minecraft "app"):

Other creations are more spontaneous. This one combines an LED and battery with some of the found parts.

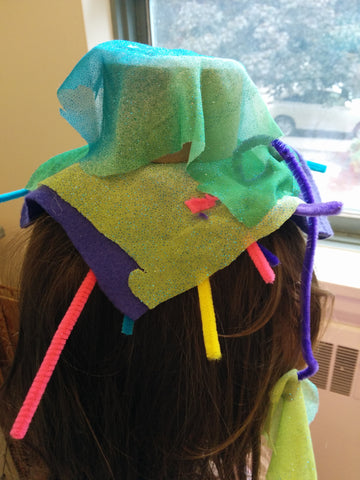
Other inventions solve problems. This is a money hat, you can carry your money with you in a concealed pocket and look fashionable too!
And some are just following artistic expression and the joy of working with your hands. With this creation he wasn't sure what it was until the very end, he was just enjoying creating a pattern and working with the materials. It wasn't until the very last minute he decided it was a picture frame!

Making with Magnets: The 'gators
I was at an event this winter and the wonderful Phonesavanh Thongsouksanoumane from Agoralab gifted me with the Curt Gabrielson book Tinkering: Kids Learn by Making Stuff. This was a very timely gift, I was running out of renewals at the library!
There's a section on magnets in the book and I thought it looked like fun. So I found a reasonably priced bag of magnets and took it in to my primary inventors workshop with a bunch of craft supplies. We had a lot fun! And so, I'd like to introduce, Attractigator and Repelligator.

I liked Repelligator the best. I like the way his jaws hovered open. But the kids were way more interested in Attractigator. They found it much more satisfying to have his jaws snap shut!
Quiz Cards: What happens next?
I love Quiz Cards. They are such a simple project. It's a simple circuit with an LED that lights up when you pick the right answer.
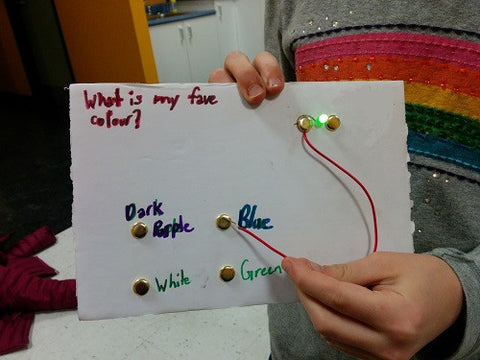
I first introduced them to a group of 9-12 year olds. They had a blast! They quickly figured out how to change the correct answer and had a great time making what they called "troll" questions. I was thrilled. By changing the circuit to change the answer, they were demonstrating a great working knowledge of circuits.
Then they wanted to add a red light. This consistently comes up in every group I work with. Now that they have the green light working, how can they add a red light for a wrong answer. No problem - I always have red LEDs on hand so the kids who finish first can give this a try. It's a bit tricky. And I don't hand out extra batteries to make it work. That's always the first request that comes up. (BTW I've tried conductive tape with this - I like conductive thread better. It's easier for the kids to change their answers.)

When I started introducing this project to the younger kids, ages 6-8, again I was surprised. Yes, it was harder to knot the conductive thread on the battery. (HINT: Practice tying knots first. I usually bring a ball of yarn and we practice tying knots before we start working.) But I almost never had to help with the circuit itself. They figured how to get it working themselves. For this age group, the circuit is a lot easier than writing the question.

We started off the latest session of the GNAG Inventors Workshop for 9-12 yr olds making Quiz Cards. But a couple of weeks later, I put in two weeks for Game Design. I gave them a few weeks notice that it was coming and a few of them started working on designs. For the games, they could use batteries, red or green LEDs, and buzzers. A few of them started working on Operation-style games. And I also had a few really cool light up games.
This first one is called Help Me. The original idea was to have a person behind the board lighting up the different LEDs. Depending on which LED was lit, the player needed to come up with a cure for an ailment.


But we wanted to automate it. We didn't want to have someone hiding behind the board. So we came up with this. We made a circle of connections to the LEDs with paper fasteners. Then we cut out a circle of cardboard and made one slice of it conductive. (Yay, tin foil!) Then we connected the battery to the conductive "slice". Now when you spin the wheel, different LEDs light up.

This next game blew me away. This was one of the kids who started planning early. There are 12 green LEDs and 4 wire leads. One 3V battery. Not to mention imagination, dedication and focus. It all works exactly as expected.

Yes - the tinfoil is part of the circuit too! Pretty impressive.
All of this was inspired by one simple project. Want to get started? You can pick up a Quiz Card kit in our online store. They're also part of the Makers Workshop. Contact me directly if you need enough for a class - I have bulk pricing for educators.